Click here for a printable version.
- Turn speed control P down to zero (fully anti-clockwise)
- Plug in power cable
- Remove the lid of vacuum bag compartment by rotating K1 or K2 into open position as shown. Gently pull out the lid and install paper dust bag on the inside of tube T. Inspect dust bag on both sides to ensure that there are no tears in the bag. Inspect dust bag every week and replace when ¾ full.
- Install lid of dustbag compartment and rotate K1 and K2 with the marks in an outward direction.
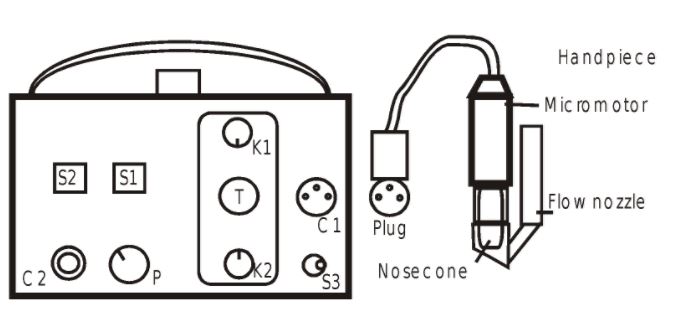
- Connect the end of vacuum hose onto metal tube T in the lid of vacuum bag compartment. (Rotate end of hose while pushing it onto tube T. Metal insert in vacuum hose and tube T must be clean of dust or use wet Q-tip to clean the metal surfaces)
- Push in the plug at end of handpiece cable into connector C1 making sure that the pins are aligned.
- Select bur rotation direction with S3 only when the handpiece is stopped. Carbide burs only cut in a clockwise rotation.
- Plug in footswitch into C2 all the way.
- Install bur into the handpiece. Rotate the micromotor past the end stop while holding onto the Flow nozzle. Observe how the bur entrance in the tip of the nose cone opened. Lock in the bur by rotating the micromotor in opposite direction, again past the end stop ‘click’. Rotate the bur with your fingers a few turns to ensure there is no friction in the handpiece. You may have the rubber dust caps installed on the bur stem. Ensure that the dust cap does not touch the tip of the nosecone.
- Hold bur in mid-air, turn power switch S1 on and observe its green light on. Turn S2 on for the vacuum motor, step on the footswitch and both handpiece and vacuum motor will start at this time.
Please contact us with any questions and we’ll be happy to help.